


Aristo-Craft D17s Staggerwing


 12-23-2016, 04:07 PM
#78
Junior Member
Join Date: Dec 2016
Posts: 1
Likes: 0
Received 0 Likes
on
0 Posts
I have this exact kit, it's been a while since I started it (10 years?) I pulled it out and am starting into it again, thanks for all the tips and tweaks, I need to print some of them out to have 'em on the workbench. I built the fuselage and started the planking all those years ago, now I need to forge ahead with the rest. I think I built a twist into the fuselage that I'm going to have to fix.. Anyway, I'll post pics when I can, Thanks for the info!
John P.
John P.
12-24-2016, 09:50 AM
#79

Thread Starter

I would love to see your photos. I'm glad that the build thread was an inspiration for you. I got some nifty graphics from Lazerworks and am hoping to paint the cowl and get my model all buttoned up right after the first of the year.
02-23-2017, 11:32 AM
#80
Thread Starter
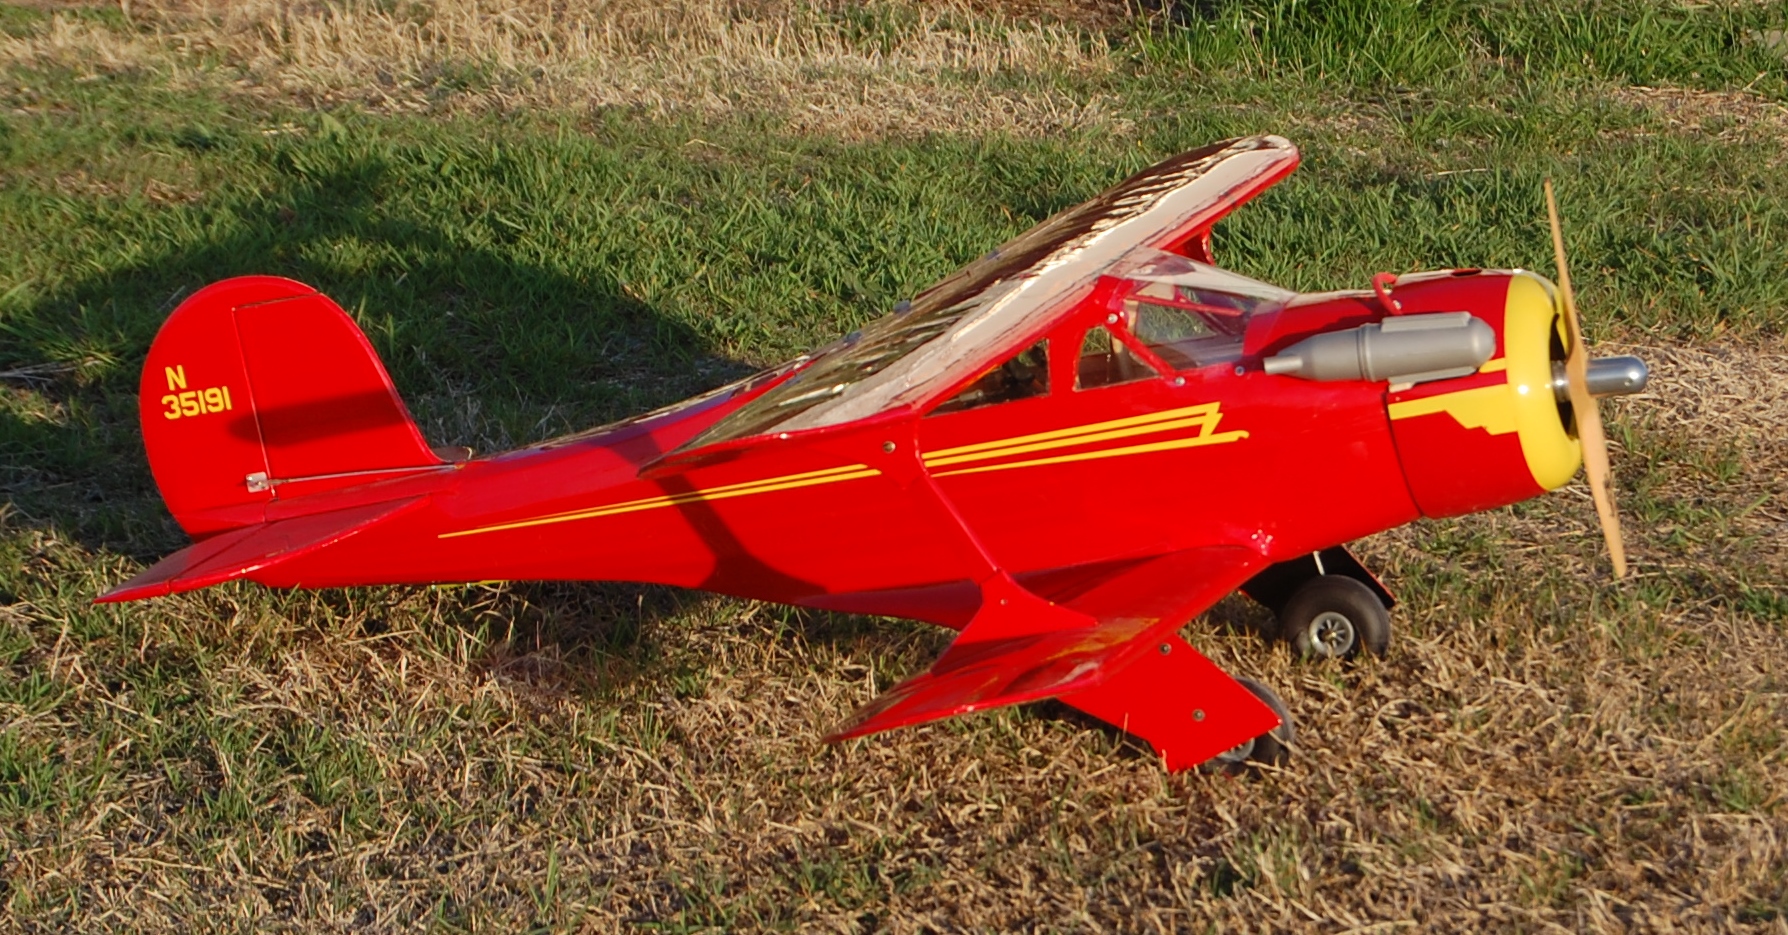
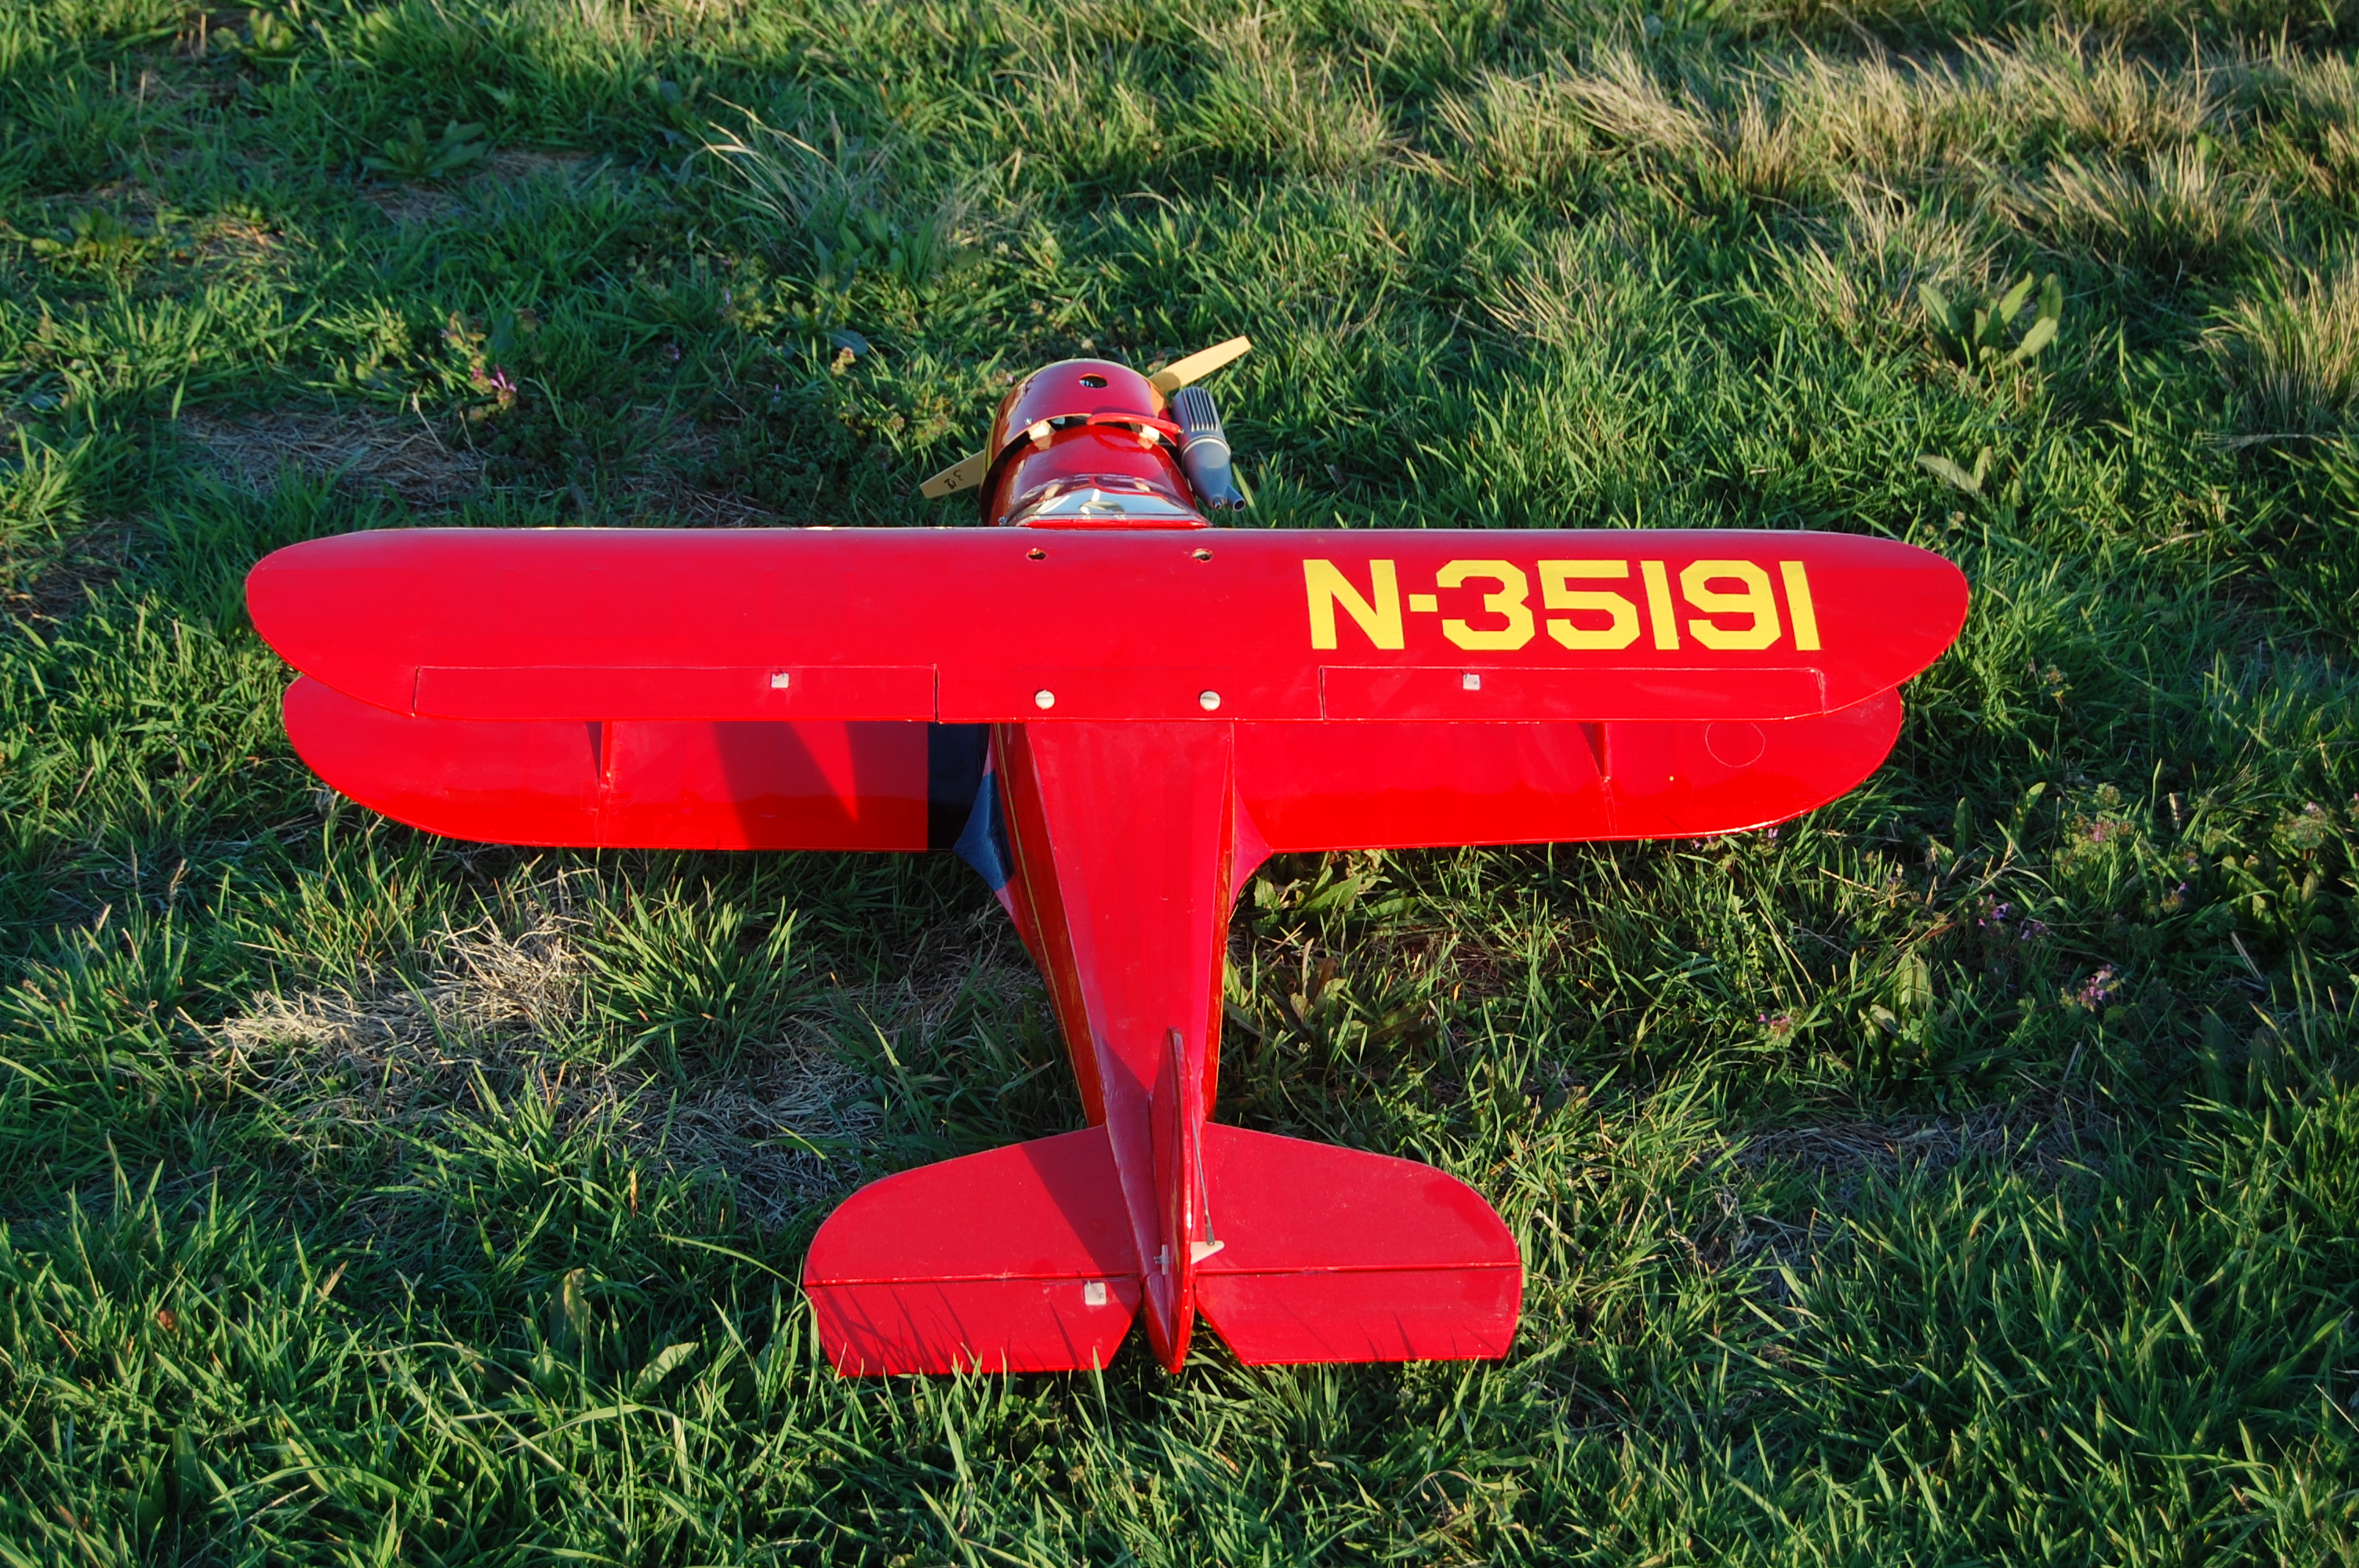
Dang, It's nigh on to two months since my last post on this thread. Eddie at Lazerworks came through with some iron on graphics that were made from a scan of the original kit decals so now it has the side stripes and N numbers. I found a local O'Riellys that will mix small quantities of paint so I finally got the paint for the cowl. Automotive paint is pretty pricey but they were willing to mix up a couple of 8 oz. cans for me. I will throw up a photo of the cowl when I finish painting it.
 02-23-2017, 01:27 PM
#82
Thread Starter
On a build related note I tried out Locktite's Go2 glue. It has it's uses but canopy glue isn't one of them. It stays too rubbery and it doesn't adhere to iron on plastic covering at all well. That said, it has worked really well on the convertible top of my daily driver Miata. The top is well past its expiration date and one of the glued seams had started to fail. That repair is about 6 months old and seems to be holding well. Go2 dries clear and it seems to be good stuff, it just doesn't work as canopy glue..
02-23-2017, 01:34 PM
#83
Thread Starter
I should have been more specific. The cowl will have two colors, red with yellow trim. The paint brand is Nason single stage, a DuPont brand. It does give good coverage. I've painted a couple of cars with it and so am familiar with its use. I expect that i will have trim color for at least two more airplanes.
03-05-2017, 08:56 PM
#85
Thread Starter
Well, seven months and change and I just about have it wrapped up. I got the cowl painted and took it outside for some photos. The yellow trim shows up as more of a cream color in some of the photos. It is attractive but the yellow is really more of a lemon yellow. As soon as the wind calms down (March in North Texas  ) It should be ready for a test flight. I don't have the all up weight yet but it seems to balance just a little bit nose heavy without any extra nose weight.


) It should be ready for a test flight. I don't have the all up weight yet but it seems to balance just a little bit nose heavy without any extra nose weight.
03-07-2017, 08:43 AM
#87
Thread Starter
Thanks for following the build Flyer. I finished with the last few details yesterday so we will find out how the maiden flight goes as soon as the wind lays.
03-07-2017, 05:47 PM
#89
Thread Starter
The wind dropped off this afternoon so I got in the maiden flight. The short version is that it flies kind of like a GeeBee. Initially I had some trouble with throttle transition. I had given the engine a proper break in on the test stand and it ran fine but on the airplane it kept wanting to load up as it idled. After several adjustments to the load speed needle and a fresh glow plug that seemed to be resolved. Even though it has good size wheels the Staggerwing doesn't like to taxi on grass and tries to stand on its nose. I suspect that although I tried to keep them up high, the landing gear doors are snagging the grass. I will take them off before the next outing. I initially tried to fly the airplane with a 11-5 propeller. This may have contributed to some of my difficulties on take off. As soon as the tailwheel cleared the pavement the plane would make a hard swing to starboard, off the runway and up onto its nose.After the third try the 11-5 prop broke and I replaced it with a 10-6. During the initial attempts I tried slowly advancing the throttle. After changing props I pointed it into the wind and gave it full throttle. It got up to flying speed before the torque swing could kick in. Initially it required quite a lot of up trim. This may have been due to having more down thrust than I am used to flying with these days. I did make quite a few changes to the aircraft so I probably shouldn't be too surprised at have to make some unexpected adjustments. The airplane is a bit of a porker at 6 pounds 5 ounces. I didn't try to add a lot of scale detail or a heavy paint job but i did use as much of the kit wood as possible. With careful wood selection I wouldn't be surprised to see someone shave a pound off of this airplane. My initial impression may have been influenced by having to fight with too much down elevator but it felt at times like I was on the edge of a stall. That said, it never did seem to actually stall. Once I got some altitude and got some up trim into it the flight seemed smoother. The ailerons seemed to be very effective. I had dialed in about 25% exponential into them. In a shallow dive it seemed to build up speed quite quickly. Since I was still trying to find a good trim adjustment on the elevator I decided to land as quickly as I could. The first landing approach ended up being high and hot. It carried speed and had a lot flatter glide than I had expected. On the second approach it came in slower and lower but still floated past the end of the runway. The flat bottomed wing seems pretty friendly but unfortunately when the landing gear got into the grass it flipped over and damaged the fin. It was the difficulty on takeoff and the tendency to land on its back that reminded me of every GeeBee I have ever seen.
So. the next step is to repair the fin, remove the gear doors and see to the elevator settings. Depending on how that works out I may also remove some of the down thrust.
Upwards and Onwards.
So. the next step is to repair the fin, remove the gear doors and see to the elevator settings. Depending on how that works out I may also remove some of the down thrust.
Upwards and Onwards.
03-08-2017, 10:05 AM
#90
Congratulations on a successful first flight! Your account reminds me of something Dr. Hawkins once told me. He said when you read an article in an R/C magazine and the author talks about how his new build/design/ARF flew perfectly on the maiden, know he is lying between his teeth. Dr. Hawkins had a number of designs published here and in the UK and he commented every one of them had varying degrees of adventure (read in terror) on the maiden flight. He believed every maiden of a new airplane would present its own set of issues to be ironed out in future flights. Some would be easily remedy in one or two flights, others would take a number of flights. As you fine tune a new airplane the flying gets smoother and easier. I haven't seen anything to dissuade me he wasn't right.
Mike
Mike
03-08-2017, 07:33 PM
#91
Thread Starter
Thanks Mike, that was good for a chuckle. I've had a few adventures through the years including a few in the OKC area. I agree with you about the first flights. It is especially true for those of us in the Just Can't Leave It Alone Brotherhood.
Further post flight review and damage assessment indicates that when the plane flipped over the fin detached from where it was glued onto the top of the horizontal stabilizer. The horizontal stabilizer also partially broke loose, failing along the grain of the quarter inch stock that functioned as a rib and attachment point to the fuselage. The glue joints all held. Structural damage was minimal and should be easily repaired. For anyone else building the plane I would suggest using solid stock in the center of the horizontal stabilizer. There was no actual damage to the fin itself or the rudder. One possible contributing factor to the problems in handling is that the two halves of the elevator now seem loosely connected. Per the kit, the halves were connected with a piece of round stock about a quarter inch in diameter. At the time of construction this seemed sufficiently rigid but now this joint can be easily flexed through fifteen or twenty degrees. I can't see any cracks or splits in the joining piece and the piece itself seems to be twisting. I will be cutting out the center section of this joiner and joining the two halves of the elevator with a standard piece of music wire. I am also considering removing some of the down thrust in the engine mount. There is quite a bit built in to the kit. In this regard it is almost like an old free flight kit. I have removed the landing gear doors in hopes that this will help with ground handling. Luckily I made them easily removable, although this was done out of concern for the gear legs flexing far enough for the doors to dig into the bottom of the wing rather than for concern over ground handling. A note that I forgot to put into the flight report; the fuselage looks much longer in the air than it does when the airplane is on the ground. I think it is just foreshortening due to the aircraft's position but it was enough to catch my attention.
Further post flight review and damage assessment indicates that when the plane flipped over the fin detached from where it was glued onto the top of the horizontal stabilizer. The horizontal stabilizer also partially broke loose, failing along the grain of the quarter inch stock that functioned as a rib and attachment point to the fuselage. The glue joints all held. Structural damage was minimal and should be easily repaired. For anyone else building the plane I would suggest using solid stock in the center of the horizontal stabilizer. There was no actual damage to the fin itself or the rudder. One possible contributing factor to the problems in handling is that the two halves of the elevator now seem loosely connected. Per the kit, the halves were connected with a piece of round stock about a quarter inch in diameter. At the time of construction this seemed sufficiently rigid but now this joint can be easily flexed through fifteen or twenty degrees. I can't see any cracks or splits in the joining piece and the piece itself seems to be twisting. I will be cutting out the center section of this joiner and joining the two halves of the elevator with a standard piece of music wire. I am also considering removing some of the down thrust in the engine mount. There is quite a bit built in to the kit. In this regard it is almost like an old free flight kit. I have removed the landing gear doors in hopes that this will help with ground handling. Luckily I made them easily removable, although this was done out of concern for the gear legs flexing far enough for the doors to dig into the bottom of the wing rather than for concern over ground handling. A note that I forgot to put into the flight report; the fuselage looks much longer in the air than it does when the airplane is on the ground. I think it is just foreshortening due to the aircraft's position but it was enough to catch my attention.
03-09-2017, 08:32 AM
#93
Thread Starter
Yeah, except for those places such as the wings where I added the ailerons, I was trying to stick with the kit materials as much as possible. I think I have enough elevator deflection available to be able to insert the wire joiner without cutting the hinges. If not, then I will just rehinge. I used CA hinges and there is plenty of space to do new hinges.
03-09-2017, 08:38 AM
#94
Thread Starter
Congratulations on a successful first flight! Your account reminds me of something Dr. Hawkins once told me. He said when you read an article in an R/C magazine and the author talks about how his new build/design/ARF flew perfectly on the maiden, know he is lying between his teeth. Dr. Hawkins had a number of designs published here and in the UK and he commented every one of them had varying degrees of adventure (read in terror) on the maiden flight. He believed every maiden of a new airplane would present its own set of issues to be ironed out in future flights. Some would be easily remedy in one or two flights, others would take a number of flights. As you fine tune a new airplane the flying gets smoother and easier. I haven't seen anything to dissuade me he wasn't right.
Mike
Mike
03-09-2017, 09:49 AM
#95
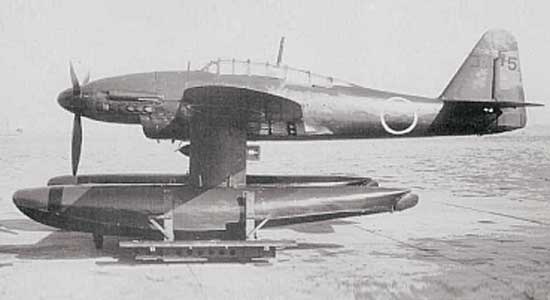
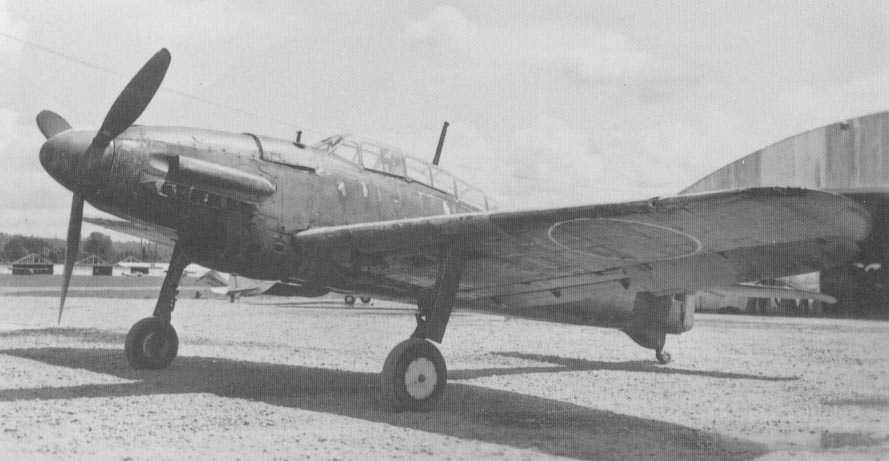
Most of his stuff was published in the UK in Flying Models magazine. He is a Rolls Royce retiree living in Bangkok. Here are a few photos one with DR. Hawkins himself. His designs include a Brewster Buffalo, a Japanese Aichi, Dornier-Zepplin D-1 to name a few.


03-09-2017, 11:28 AM
#96
Thread Starter
Hmmm, the Dornier and the Aichi both look familiar. I like the British magazines when I can get them but living in southwest Oklahoma and the Wichita Falls, TX area you can imagine how common they were on the magazine racks. Maybe the Dornier was in Model Builder?
03-10-2017, 10:05 AM
#97
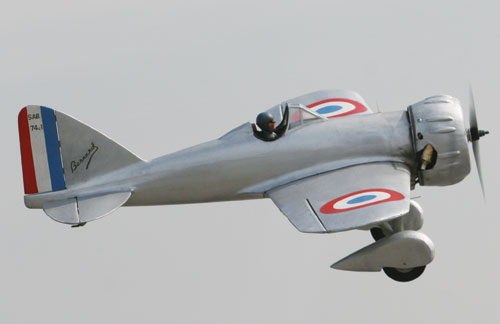
I built the Dornier but it had an accident berfore getting to fly it. I plan on building it again. I have the plans for the Aichi (full name Aichi M6A1 Seiran), Dr. Hawkins built a great looking Prototype but the .19 on it didn't have enough to get it into the air with the drag of the floats. When I build that one I'll power it a little better and build the land based version the M6A1-K Nanzan. I found the misfiled photo I have of Dr. Hawkins' Bernard and have attached it along with photos of the Aichi Seiran and Nanzan.
03-10-2017, 02:52 PM
#98
Thread Starter
The Bernard looks like it would make a nifty sports scale model. On the Staggerwing front I cleaned up the horizontal stabilizer, did a little surgery and installed a music wire joiner between the elevator halves. The original wooden joiner looks like it failed in torsion, splitting along the grain. The horizontal stabilizer and the fin/rudder are back on the plane and I'm waiting for the glue to dry. We are looking at some weather over the weekend so by the time the weather clears it should be ready for another test flight.
03-14-2017, 05:14 PM
#99
Thread Starter
Well there was going to be another test flight today until I broke the 10-6 prop and discovered that I hadn't brought any spares with me. On a more productive note I've been studying the plans and have noticed that I seem to have lost some of the right thrust when I opened up the slot in the engine mounting plate to accommodate the ball bearing .40 that I installed. I will have to measure but the plans seem to show close to 5 degrees of right offset. A little right thrust may help to tame the takeoff swing.