


My Heng Long KV-1 exhaust modification
 03-30-2024, 02:28 PM
#1
So as you may know, the Heng Long KV-1 comes from the factory with the smoke exiting what is supposed to be the tail light. The actual exhaust pipes are on top of the engine deck. The tank is provided with non-functional, solid display pipes. I tried to remove them and drill them out, but made a hash of it. So, I ended up buying metal replacements from Forgebear Tanks:
https://www.forgebeartanks.com/store...A16_Scale.html
These need some seam filling and sanding but hey, that's modeling.
So first thing was to remove and install the new exhaust tips. The tips come with a downspout that goes down into the tank, but as it turns out you'll have to grind off part of them anyway.
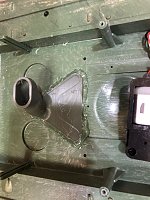
I carefully ground off the glued-in tab for the plastic exhaust from the inside of the top deck, and then ground out a a hole for the new metal tips to fit. I epoxied them in place.
Here you can see the down-spouts poking through:

My first thought was to do something like this:

But as it turns out, there is not enough room for this. There isn't even enough room for the downspouts from the exhaust tips!
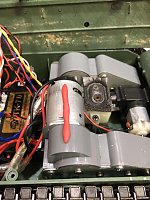
I put some modeling clay on top of the top motor and pushed the lid down, and as you can see, there is no room:


So, the downspouts had to go. I put an ice pack on the top side against the exhaust tip so that as I ground away the downspout it would not melt the epoxy or plastic of the tank. This is what I ended up with:

So, how to get smoke over here now with nothing to hook up to the exhaust pipes?
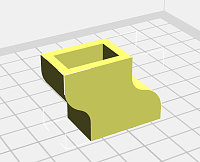
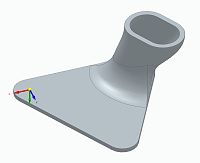
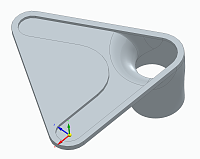
I designed, modeled, and 3D printed a low-profile exhaust manifold that relocated the input pipe farther away from the motor.
Initially I made the manifold .1" tall, but even that was hitting. I had to grind away some metal from the motor bracket and reduce the height of the manifold to .07".
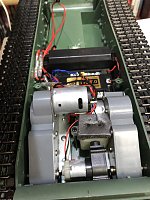
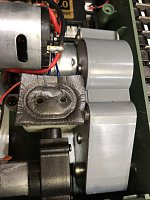
Here you can see how the motor bracket extends higher than the motor housing:

I ground off the top part:

Here is the 3D printed manifold:


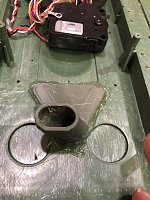
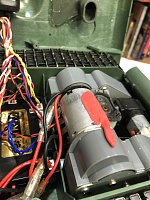
I hot-glued it in place:

I chose hot glue because if it didn't work I could relatively easily remove it and try again. It's permanent enough to work permanently, too.
To hook it up, I put a right-angle connector on my manifold pointing in one direction, and pointed the one on the smoker in the opposite direction. This lets you have a service loop of tubing that won't fold or pinch or kink on itself when you put the tank together, while also giving you something to work with while you try and get it together.

Here is a short video that shows the results:
The low-profile exhaust manifold can be downloaded here:
https://www.thingiverse.com/thing:6557271
https://www.forgebeartanks.com/store...A16_Scale.html
These need some seam filling and sanding but hey, that's modeling.
So first thing was to remove and install the new exhaust tips. The tips come with a downspout that goes down into the tank, but as it turns out you'll have to grind off part of them anyway.
I carefully ground off the glued-in tab for the plastic exhaust from the inside of the top deck, and then ground out a a hole for the new metal tips to fit. I epoxied them in place.
Here you can see the down-spouts poking through:
My first thought was to do something like this:
But as it turns out, there is not enough room for this. There isn't even enough room for the downspouts from the exhaust tips!
I put some modeling clay on top of the top motor and pushed the lid down, and as you can see, there is no room:
So, the downspouts had to go. I put an ice pack on the top side against the exhaust tip so that as I ground away the downspout it would not melt the epoxy or plastic of the tank. This is what I ended up with:
So, how to get smoke over here now with nothing to hook up to the exhaust pipes?
I designed, modeled, and 3D printed a low-profile exhaust manifold that relocated the input pipe farther away from the motor.
Initially I made the manifold .1" tall, but even that was hitting. I had to grind away some metal from the motor bracket and reduce the height of the manifold to .07".
Here you can see how the motor bracket extends higher than the motor housing:
I ground off the top part:
Here is the 3D printed manifold:
I hot-glued it in place:
I chose hot glue because if it didn't work I could relatively easily remove it and try again. It's permanent enough to work permanently, too.
To hook it up, I put a right-angle connector on my manifold pointing in one direction, and pointed the one on the smoker in the opposite direction. This lets you have a service loop of tubing that won't fold or pinch or kink on itself when you put the tank together, while also giving you something to work with while you try and get it together.
Here is a short video that shows the results:
The low-profile exhaust manifold can be downloaded here:
https://www.thingiverse.com/thing:6557271
 03-30-2024, 02:33 PM
#2

Nice solution. Now if I only used smokers...  A lot of folks have issues with the smokers putting out unequal smoke from both tubes so that also would solve that issue.
A lot of folks have issues with the smokers putting out unequal smoke from both tubes so that also would solve that issue.
03-30-2024, 03:21 PM
#3
I'm finding already that this system has a propensity for "flooding". The smoke condenses in the tube and manifold, and then gets "plugged" and no longer smokes. I'm going to redesign the manifold with a low spot near the inlet for condensate to pool. Or maybe even drain down into a separate tube.
03-30-2024, 08:25 PM
#4
Yeah, the flooding is really a problem. You get one good run, and when you shut off the tank, any vapors left in the system condense and plug the plumbing.
So, I'm going to redesign the manifold to eliminate tubing and small passages altogether.
I'm mocking up a "chimney" to mount directly to the roof of the smoker, which will then go up to the bottom of the engine deck where the current manifold is. I'm guessing ultimately the chimney will be one piece with the manifold. That way when you remove the tank upper hull it exposes the top of the smoker for refilling. I suppose I'll have some kind of gasket between the roof of the smoker and the bottom of the chimney. It's not clear in my mind what this will look like yet.
I'm printing a prototype to get a feel for the lay of the land.
03-31-2024, 04:11 PM
#5
So, the long tubing run acted like a condenser, allowing the smoke vapor to condense back to liquid, plugging the hose. Might get away with using larger diameter tubing.
But I redesigned the manifold to extend down and seal against the roof of the smoker, using some foam gasket to make a seal.
It still can get plugged up in the ultra-thin passages over the motor. I may eliminate the center stiffening rib or substantially widen the passages to give more room for smoke and less chance of condensation lock.
I did a clearance check with some modeling clay and there is no clearance left at all:
I think I read in a thread somewhere about low-profile motor assemblies for the KV-1?
The following users liked this post:
tankme (04-09-2024)
04-12-2024, 08:23 AM
#8
Well, the hot glue is not holding up so well to the heat and oily condensation of the smoke. Also the manifold is getting warped slightly just below the main smokestack in the thin area of the manifold. I've modified the design to add a larger radius (without hitting the motor) between the main smokestack and the thin part of the manifold, which should increase airflow and beef up the area that was warping. I've also modeled the smokestack differently so that it has a more smooth transition from one end to the other, which should make 3D printing without supports easier.
I'm going to clean everything well with rubbing alcohol before doing the next hot glue up - hopefully it will bond and stay. If the oil continues to wick under the hot glue and cause it to come loose, I'll have to resort to epoxy.
I'll update the thingiverse site shortly.
I'm going to clean everything well with rubbing alcohol before doing the next hot glue up - hopefully it will bond and stay. If the oil continues to wick under the hot glue and cause it to come loose, I'll have to resort to epoxy.
I'll update the thingiverse site shortly.
04-12-2024, 03:21 PM
#9
If printed out of ASA, ABS, or PETG, you can use MEK to bond to the KV plastic.
04-17-2024, 11:35 AM
#11
I have found that the latest version of the manifold warped at the top of the chimney from the heat of the smoke.
This, plus the oily residue of the smoke condensation, pulled the hot glue free.
I have modified the design to double the wall thickness where the warping was happening, and increased the surface area of contact between the manifold and the upper hull.
I then glued it in place with gel superglue.
We'll see how this holds up.
Thingiverse has been updated with version 4 of the manifold.
https://www.thingiverse.com/thing:6557271/files
