


Top RC Zero from Gator R/C
 12-14-2015, 05:35 PM
#51

My Feedback: (5)
Join Date: Jan 2010
Location: vancouver, BC, CANADA
Posts: 131
Likes: 0
Received 0 Likes
on
0 Posts
nice work hot rod mine is all hinged and ready for servos i scrapped the L brackets they supplied did not like there idea so i glued and screwed some plywood blocks to the covers and screwed the servos to those i used there linkage but changed out there 2mm bolts with some longer ones seem to work well .on the tailwheel i had to shim one side seems the plywood former that u screw the tailwheel to is a little off to one side about 3mm might be only on mine lol as per the tailwheel i was going to run a pushrod from the front just under the rudder servo still wondering about weight issue like yourself will be putting servos in the elevators . just wish i new how much weight this will need in the front plan on using either an evo77 or the saito 60 3cylinder radial ill try and post pics not not very good at that cheers and kkep us in the loop


 12-15-2015, 07:23 AM
#53

The flap hinges seem acceptable, and there is no easy replacement for flat hinges that size. First step is to once again test fit all the hinges in the slots. I noticed they were a bit loose on mine, so I knew I'd need to get as much glue in there as I could. Once again I'm using Z-poxy 30 minute glue. I put the vaseline on the hinge joint. Then I used a small piece of card to jam as much glue into each slot as I could.

Once the glue slots were well packed, I smeared glue on the hinges, paying attention to get plenty of glue in the little holes in the hinges. I then slid all the hinges for one flap into the wing, then attached the flap. Once again some paper towels and alcohol are used to wipe down any extra. They line up well, when the back of the flap is aligned with the wing it gives the correct spacing. Make sure you cycle the surface to get the hinges aligned with each other to prevent binding once they dry. I clamped it in place and moved to the 2nd Flap to repeat the process.

After about 30 minutes I once again cycled them to make sure everything was good.
I decided to check into the elevator servo mounting. I verified that I was happy with the system that mounts the stab to the carbon fiber joiner tubes before deciding to mount the servos into the horizontal stabs. It's a tight fit to get the servo down in the stab, but a standard size fits. I'll be using HS-5685MH Hitec servo's throughout. Plenty of torque, even a bit overkill. When attempting to get the servo squeezed down in the little hole I noticed the mount seemed to move. I checked again, and could see that the mounts needed a bit more glue. Here's a couple photos looking inside the stab showing that it would be good to verify there's enough glue to hold them solid. I mixed up some Hysol and shoved it into the areas that needed more glue and set it aside for later.


I started checking on the Flap and Aileron mounting. They use nice Jet-style L brackets, common on Jet ARF's. Problem is, they actually ARE jet mounts. That means the servo mounting screws are the right length and diameter to hard mount servos. They will not fit into the grommets for rubber mounting. I think I'll take the risk and do the hard mount for my Zero since I'm using the twin. Anyone using a single cylinder engine would be well advised to convert to a rubber mounting system by mounting the servos to the hatch or by using smaller screws with nuts. Here's a photo of the mount attached to the servo. Make sure you use thread locker if you hard mount them using the machine screws.

I'll be getting the servos mounted and will post more info soon.
Once the glue slots were well packed, I smeared glue on the hinges, paying attention to get plenty of glue in the little holes in the hinges. I then slid all the hinges for one flap into the wing, then attached the flap. Once again some paper towels and alcohol are used to wipe down any extra. They line up well, when the back of the flap is aligned with the wing it gives the correct spacing. Make sure you cycle the surface to get the hinges aligned with each other to prevent binding once they dry. I clamped it in place and moved to the 2nd Flap to repeat the process.
After about 30 minutes I once again cycled them to make sure everything was good.
I decided to check into the elevator servo mounting. I verified that I was happy with the system that mounts the stab to the carbon fiber joiner tubes before deciding to mount the servos into the horizontal stabs. It's a tight fit to get the servo down in the stab, but a standard size fits. I'll be using HS-5685MH Hitec servo's throughout. Plenty of torque, even a bit overkill. When attempting to get the servo squeezed down in the little hole I noticed the mount seemed to move. I checked again, and could see that the mounts needed a bit more glue. Here's a couple photos looking inside the stab showing that it would be good to verify there's enough glue to hold them solid. I mixed up some Hysol and shoved it into the areas that needed more glue and set it aside for later.
I started checking on the Flap and Aileron mounting. They use nice Jet-style L brackets, common on Jet ARF's. Problem is, they actually ARE jet mounts. That means the servo mounting screws are the right length and diameter to hard mount servos. They will not fit into the grommets for rubber mounting. I think I'll take the risk and do the hard mount for my Zero since I'm using the twin. Anyone using a single cylinder engine would be well advised to convert to a rubber mounting system by mounting the servos to the hatch or by using smaller screws with nuts. Here's a photo of the mount attached to the servo. Make sure you use thread locker if you hard mount them using the machine screws.
I'll be getting the servos mounted and will post more info soon.
12-15-2015, 06:46 PM
#54
Senior Member
My Feedback: (3)
Join Date: Mar 2002
Location: Otis Orchards,
WA
Posts: 993
Likes: 0
Received 0 Likes
on
0 Posts
Well,
Here is the preliminary jigging for what will be the cradle. I also did some searching around the internet and found some neat little additions that will take this airplane to the next step!
Chris


Here is the preliminary jigging for what will be the cradle. I also did some searching around the internet and found some neat little additions that will take this airplane to the next step!
Chris
12-15-2015, 09:43 PM
#55
My Feedback: (5)
Join Date: Jan 2010
Location: vancouver, BC, CANADA
Posts: 131
Likes: 0
Received 0 Likes
on
0 Posts
if anybody can please list the cg and the controll throws for me . cant seem to downlaod the manual tried a bunch of times . i think its time for a new computer. hotrod plane is looking great as i mentioned though i scraped the L brackets and mounted my servos to the covers will do my elevators tomorrow but it does look rather tight in there hardest part will be cutting the slot in the perfect position
12-16-2015, 05:35 AM
#56
if anybody can please list the cg and the controll throws for me . cant seem to downlaod the manual tried a bunch of times . i think its time for a new computer. hotrod plane is looking great as i mentioned though i scraped the L brackets and mounted my servos to the covers will do my elevators tomorrow but it does look rather tight in there hardest part will be cutting the slot in the perfect position
Aileron - 30mm both ways
Elevator - 30mm both ways
Flaps 40mm drop
CG is 145mm at the root, right at the aft edge of the gear doors
12-16-2015, 10:51 PM
#58
My Feedback: (5)
Join Date: Jan 2010
Location: vancouver, BC, CANADA
Posts: 131
Likes: 0
Received 0 Likes
on
0 Posts
thanks gentlemen i gotr downloaded throws on elevator and aileron seem kinda high and the flaps should be a little more just thinking of my last zero i think ill use those as high rates and dial it down about on the low end flaps is a toss up hotrod are you going to set up a take off flap as well i had it on my last zero and seemed to work quite well. also ordered my evo777 should be here next week . hope it fits the cowl otherwise i will have to split it and ad an inch guess we will see
12-17-2015, 06:31 AM
#59
The Zero has split flaps. They provide a lot of drag, and a bit of lift. This plane should have light enough wing loading that flaps on take off would not help much. It's a good thing to do on a plane with high wing loading to improve the washout and lift, but the Zero shouldn't need it.
I will want plenty of throw on the flaps for landing. You can come in steeper or with more power, either way it makes it easier to hit your spot on landing. I always put my flaps on a slider and adjust based on the wind.


I will want plenty of throw on the flaps for landing. You can come in steeper or with more power, either way it makes it easier to hit your spot on landing. I always put my flaps on a slider and adjust based on the wind.
12-17-2015, 03:37 PM
#60

The kit arrived today but required signature, so I will get mine tomorrow. I ordered the full kit gear and spinner as well. I am probably going to order another Evo 777 for it . Really do not want to take the other one out of the corsair. I already have an extra collector ring and McDaniels glow system so why not. Wish the Moki would fit, but no go on that.
I will want plenty of throw on the flaps for landing. You can come in steeper or with more power, either way it makes it easier to hit your spot on landing. I always put my flaps on a slider and adjust based on the wind.
I do exactly the same on mine.
I will want plenty of throw on the flaps for landing. You can come in steeper or with more power, either way it makes it easier to hit your spot on landing. I always put my flaps on a slider and adjust based on the wind.
I do exactly the same on mine.
12-18-2015, 06:33 AM
#62
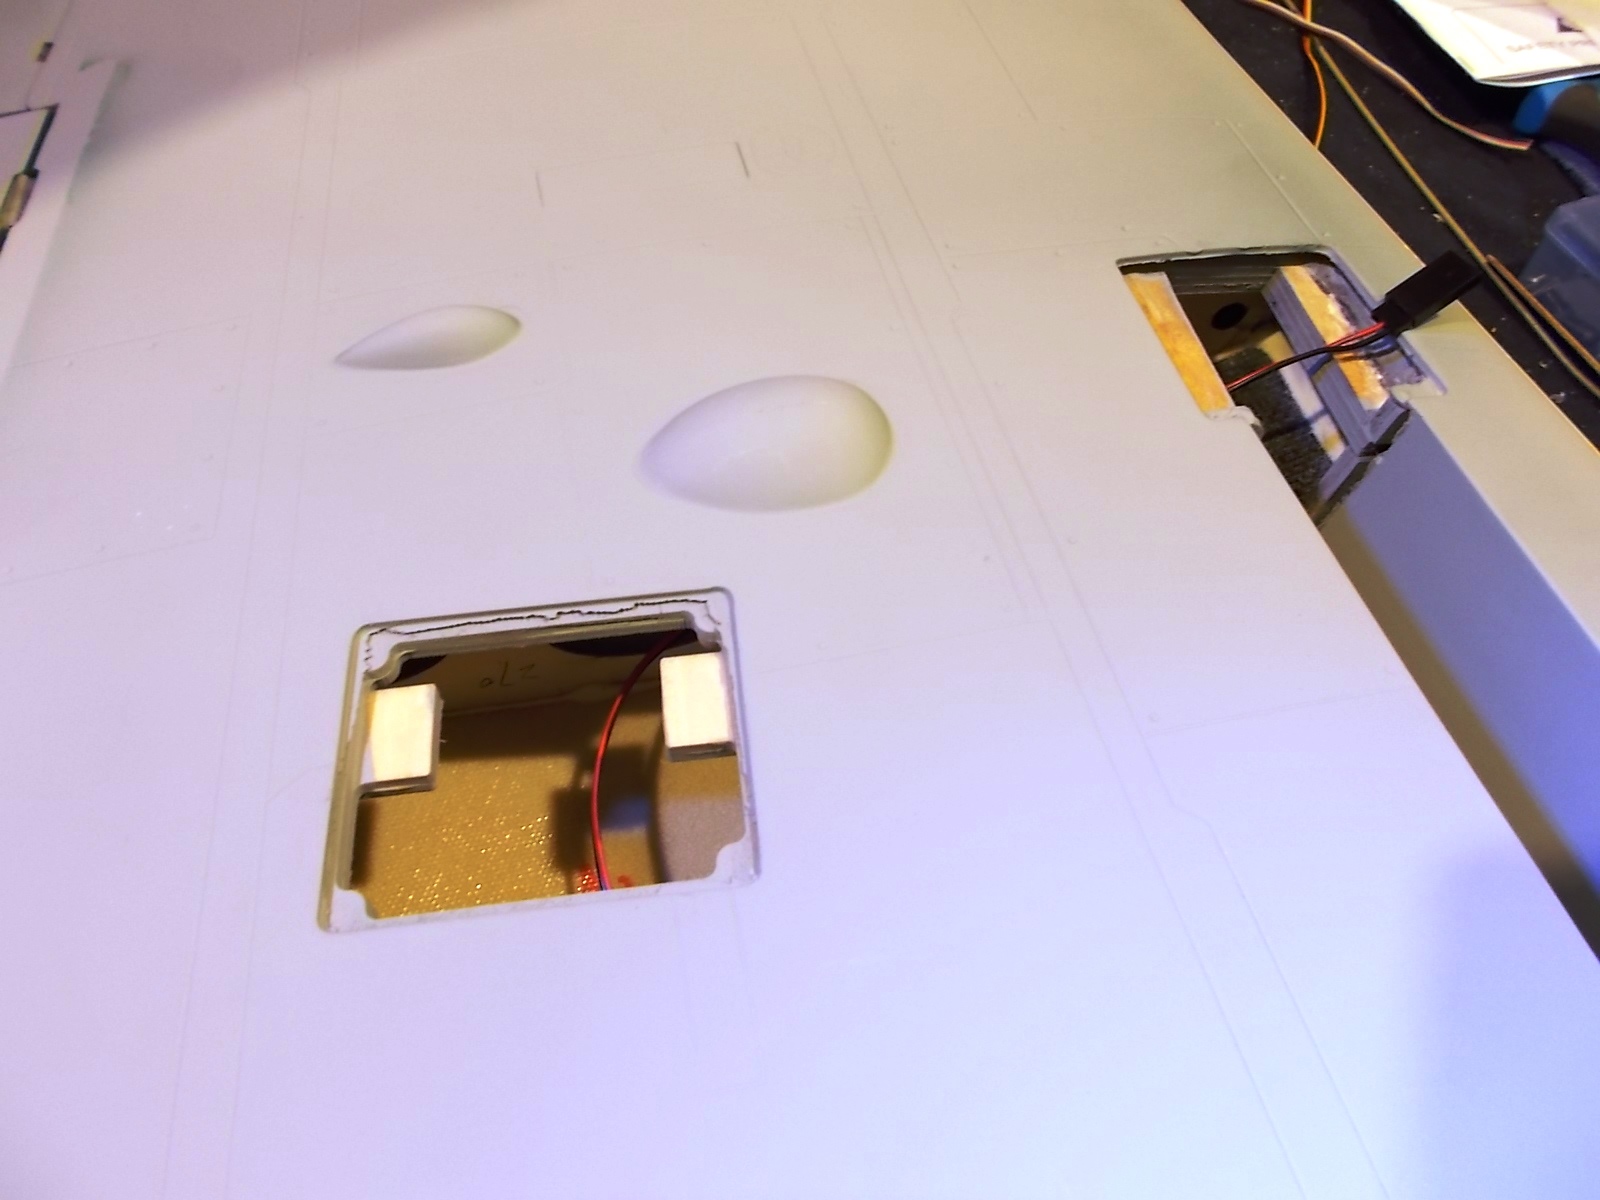
Decided to get the servos mounted in the Horiz. Stab. As shown earlier, I added a bit of glue and the rib that mounts the servo now seems strong enough for the task. I wanted to get the servo as close to the skin as I could to minimize the servo arm length. First step is to get the wire threaded into the hole. By making a bend in the wire and orienting the plug I was able to fish it in there, then grab it with a needle nose pliers.

Here's a photo showing the inside of the wing, and wire routing through the hole.

I positioned the servo onto the mount, then used a fine drill bit in a pin vise to drill the hole for the servo screw. I oriented the servo so the output shaft would be farthest from the control surface to minimize alignment angles.

I drilled one, put in a screw, then drilled the next, put in the screw, until all four are done. My servo arm center was right about on the top of the servo output shaft, so I knew that I could measure to the shaft to determine where the slot would be. I used a stick to measure and marked the slot location. I did the initial cut with a dremel wheel, then filed it to get the right alignment and shape for the slot. It had to be wide enough to allow the servo horn to be dropped in and mounted.

I centered the servo with my Hitec programmer, and mounted the servo arm. Check for movement to make sure the slot is shaped correctly.

I decided to use some 4-40 hardware I had, but as mentioned earlier I think the stock hardware would be up to the task. It would even be a bit lighter than what I used.

Even using the far outside hole on the control horn I was able to easily exceed the 30mm recommended travel for the elevator.
I should have some time soon to get back to the wing and get the servos and retracts mounted.
Here's a photo showing the inside of the wing, and wire routing through the hole.
I positioned the servo onto the mount, then used a fine drill bit in a pin vise to drill the hole for the servo screw. I oriented the servo so the output shaft would be farthest from the control surface to minimize alignment angles.
I drilled one, put in a screw, then drilled the next, put in the screw, until all four are done. My servo arm center was right about on the top of the servo output shaft, so I knew that I could measure to the shaft to determine where the slot would be. I used a stick to measure and marked the slot location. I did the initial cut with a dremel wheel, then filed it to get the right alignment and shape for the slot. It had to be wide enough to allow the servo horn to be dropped in and mounted.
I centered the servo with my Hitec programmer, and mounted the servo arm. Check for movement to make sure the slot is shaped correctly.
I decided to use some 4-40 hardware I had, but as mentioned earlier I think the stock hardware would be up to the task. It would even be a bit lighter than what I used.
Even using the far outside hole on the control horn I was able to easily exceed the 30mm recommended travel for the elevator.
I should have some time soon to get back to the wing and get the servos and retracts mounted.
12-18-2015, 03:06 PM
#63
Well it may be a while. Mine showed up looking like it was pushed here the whole way by forklift and machetes. Unfourtionaly its a total loss only the right wing panel, stabs and hardware made it intact. Called fedex to come pick their trash pile back up.
!!! SAD DAY !!! Guess I will be working on the Meister this weekend.
!!! SAD DAY !!! Guess I will be working on the Meister this weekend.
12-18-2015, 07:47 PM
#67
I am not trying to be negative about it, just really disappointed with Fedex. This is second plane in 30-33yrs to have been destroyed in shipping out of hundreds. It was packed REALLY WELL to avoid this. It took a lot of effort and force to tear holes through the boxes.
The plane itself appears to be fabricated quite well. Nice detail and light. I liked what I saw less the ripped up parts.
The plane itself appears to be fabricated quite well. Nice detail and light. I liked what I saw less the ripped up parts.
12-19-2015, 08:42 AM
#68
After sending an E-mail to GatorRC yesterday I received a call from Mike "GatorRC" at 8am this morning to let me know he is on top of this and will deal with Fedex himself. He is sending another kit out ASAP.
!!! Now this is Top Notch RC !!! You could not ask for a better person to deal with.
!!! Now this is Top Notch RC !!! You could not ask for a better person to deal with.
The following users liked this post:
jeep36 (02-25-2021)
12-19-2015, 09:37 AM
#69

My Feedback: (41)
After sending an E-mail to GatorRC yesterday I received a call from Mike "GatorRC" at 8am this morning to let me know he is on top of this and will deal with Fedex himself. He is sending another kit out ASAP.
!!! Now this is Top Notch RC !!! You could not ask for a better person to deal with.
!!! Now this is Top Notch RC !!! You could not ask for a better person to deal with.
For others we ship FedEx. On average we have great success but these planes can and do occasionally get damaged and we plan for it.
All planes are sent fully insured so rest assured we can easily resolve these issue.
Tim thank you for these kind words and sorry that your plane suffered.
Mike Mueller
The following users liked this post:
jeep36 (02-25-2021)
12-19-2015, 10:06 AM
#70
My Feedback: (45)
Wow, that is what customer service is about. I've been following these threads intently and so far it seems like these are some of the best planes in this range to hit the market in awhile. If I didn't already have both a p-51 and a zero I'd be buying one of these for sure.
Hopefully as the business grows, more models will be released (BF-109, hint hint).
Hopefully as the business grows, more models will be released (BF-109, hint hint).
12-21-2015, 07:23 AM
#71
As you mentioned, the packaging is about as good as it gets for these. That box looks like it was dropped off the truck, then run over by the Fedex truck behind it!
I got some more building done over the weekend. Here's the steps I took to mount the servos into the wing. First I made some extensions so the cables would reach to the wing attachment point. I will put an Ashlock connector on the end (common for jets, available at Dreamworks). As usual for me, I used shrink tubing to secure the extension together with the servo plug.

I got the extensions done, and made a two-wire extension for the main retract. First I threaded the retract extension through.
I mounted the brackets on the servos, and found that some trimming to the mounts to make way for the servo wire outlet would help me get them in easier. Don't trim too much, or you won't have enough wood for the screws to mount.

Drilling the mount screw holes went well, and they dropped right in. The covers aligned well with the servo horns. Remember, If you're putting a single cylinder gasser in this plane I would recommend you maintain the rubber mounts on the servo. This could cause the alignment of the hatch covers to change as well, and would require some additional hardware.
The hatch covers mounted easily, and the wood seemed good. I drilled some holes and used the provided screws. I was happy with the servo mounting system provided.
Next step was to add the control rods. I used 4-40 rods instead of the metric ones provided. I did find that by drilling the provided ball links out just a bit they worked very well with 4-40. That would be the easiest way to do it. I would think the stock rods would work Ok too if that's what you want to do, but I like the added stiffness of the bigger linkage. Here's what my flap and aileron linkage looked like after installation.


I did use the stock ball link on one end of the aileron, and was happy with how it grabbed the 4-40 sized rod after drilling. They even came with some little ny-lock nuts.

I got some more building done over the weekend. Here's the steps I took to mount the servos into the wing. First I made some extensions so the cables would reach to the wing attachment point. I will put an Ashlock connector on the end (common for jets, available at Dreamworks). As usual for me, I used shrink tubing to secure the extension together with the servo plug.
I got the extensions done, and made a two-wire extension for the main retract. First I threaded the retract extension through.
I mounted the brackets on the servos, and found that some trimming to the mounts to make way for the servo wire outlet would help me get them in easier. Don't trim too much, or you won't have enough wood for the screws to mount.
Drilling the mount screw holes went well, and they dropped right in. The covers aligned well with the servo horns. Remember, If you're putting a single cylinder gasser in this plane I would recommend you maintain the rubber mounts on the servo. This could cause the alignment of the hatch covers to change as well, and would require some additional hardware.
The hatch covers mounted easily, and the wood seemed good. I drilled some holes and used the provided screws. I was happy with the servo mounting system provided.
Next step was to add the control rods. I used 4-40 rods instead of the metric ones provided. I did find that by drilling the provided ball links out just a bit they worked very well with 4-40. That would be the easiest way to do it. I would think the stock rods would work Ok too if that's what you want to do, but I like the added stiffness of the bigger linkage. Here's what my flap and aileron linkage looked like after installation.
I did use the stock ball link on one end of the aileron, and was happy with how it grabbed the 4-40 sized rod after drilling. They even came with some little ny-lock nuts.
12-21-2015, 07:36 AM
#72
Next step is to mount the main gear into the wing. I mounted the wheel to the axle. I had to move the axle out a bit to get them the right length, and used couple of washers. Also a good time to locktite the set screw. I slid the door mounts onto the retract main shaft. I noticed the little set screws weren't working too good. By replacing the stock set screws with some longer ones I had I found that they threaded in better. The way they locked to the struts seemed to be secure.

I aligned the retracts by centering the wheel in the well and drilled pilot holes. Take care with this step, you wouldn't want to drill them wrong. They seemed to line up well and were not hard to mount. I opted to use some #6 allen head screws that were a bit bigger than stock. I had to enlarge the holes in the retract body just a touch. Initial mounting made me think the arm of the retract would hit the bottom of the well and not allow them to lock, but this was not the case. They come very close, but they didn't touch. The retracts are 90 degrees, so they have to drop down into the wheel wells quite a bit to account for the dihedral. This means the longer of the two door mounts will go towards the wheel.
On to the gear doors. I noticed that even with the door mount at the lowest level, the doors were not made right in that the smooth part did not line up. I ground them smooth and added some G-10 to make up for it. I found that I didn't need the wood spacers on the top gear mount, but needed at least one on the bottom. By using the right thickness of glass I was able to space it up correctly. I also noticed that It worked better to sand the wood spacer to more correctly match the angle of the wing surface so the gear doors would align with the wing skin.

Getting the doors aligned is not easy. You must first make sure you have the correct toe setting on the mains. I opted to align the gear straight, and to do this I had to mount the wings. If you don't do this first you'll find that your gear doors won't fit if you have to adjust the toe later. I noticed the struts could have a tighter fit into the retracts, but if you get a good allen and bear down hard they seem to lock in.

I aligned the retracts by centering the wheel in the well and drilled pilot holes. Take care with this step, you wouldn't want to drill them wrong. They seemed to line up well and were not hard to mount. I opted to use some #6 allen head screws that were a bit bigger than stock. I had to enlarge the holes in the retract body just a touch. Initial mounting made me think the arm of the retract would hit the bottom of the well and not allow them to lock, but this was not the case. They come very close, but they didn't touch. The retracts are 90 degrees, so they have to drop down into the wheel wells quite a bit to account for the dihedral. This means the longer of the two door mounts will go towards the wheel.
On to the gear doors. I noticed that even with the door mount at the lowest level, the doors were not made right in that the smooth part did not line up. I ground them smooth and added some G-10 to make up for it. I found that I didn't need the wood spacers on the top gear mount, but needed at least one on the bottom. By using the right thickness of glass I was able to space it up correctly. I also noticed that It worked better to sand the wood spacer to more correctly match the angle of the wing surface so the gear doors would align with the wing skin.
Getting the doors aligned is not easy. You must first make sure you have the correct toe setting on the mains. I opted to align the gear straight, and to do this I had to mount the wings. If you don't do this first you'll find that your gear doors won't fit if you have to adjust the toe later. I noticed the struts could have a tighter fit into the retracts, but if you get a good allen and bear down hard they seem to lock in.
12-21-2015, 08:30 AM
#73
I used some tape, and some measuring to align the gear doors. Make some lines and get the holes where you want them. I started with small holes, then used a tiny rat tailed file to make the holes align perfectly. This is a critical step, so try to take your time and drill them correctly. Some additional spacing work helped to get them to align perfectly with the wing skin. It took a bit of work and time, but I was happy with the result. Much more work than the Top Flite FW-190 I did that comes almost pre-done, but because you are doing it yourself you can get them more perfectly aligned (if you're good)
.
That's about it for the wings. I'll be adding some details like guns later, but functionally they're done. I'll get started on the fuse next.
.
That's about it for the wings. I'll be adding some details like guns later, but functionally they're done. I'll get started on the fuse next.
12-21-2015, 05:21 PM
#74
My Feedback: (5)
Join Date: Jan 2010
Location: vancouver, BC, CANADA
Posts: 131
Likes: 0
Received 0 Likes
on
0 Posts
did you find the gear door mounts hard to slip onto the strut i started by was scratching the paint did you widen them in any way i also took the allen screws out . builds looking good hot rod..i still havnt tried my retracts yet i usually use nuematic first pair of electrics ive had hopefully they work better than the corsair electrics lol
12-22-2015, 06:02 AM
#75
My door mounts seemed to slide on just fine. There might be a burr or something where the allen screw comes out. Don't forget you have to slide them on from the top end of the strut prior to mounting the strut into the retract body.
I used the allen set screws to hold them on, but some of the stock screws were binding in the holes. By using some bit longer ones I had laying around I was able to get them to thread in better.
I used the allen set screws to hold them on, but some of the stock screws were binding in the holes. By using some bit longer ones I had laying around I was able to get them to thread in better.